Downloading Apache Tomcat
- Download the latest version of Apache tomcat viz. Apache Tomcat 7 from Tomcat 7
- According to your system configuration download the appropriate version.
- I'm showing you for Windows 7 32-bit configuration viz. apache-tomcat-7.0.34-windows-x86.zip
- Extract it in appropriate folder viz. C :\.
Setting up JDK Path
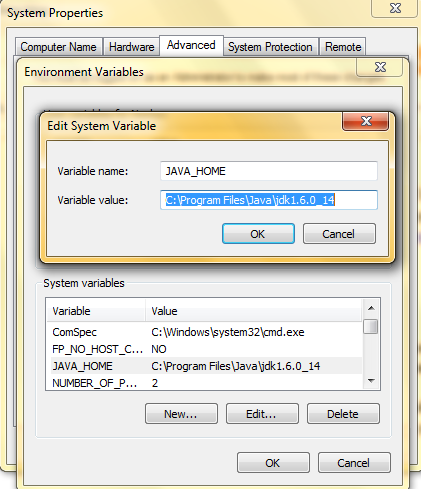
- Create an environment variable "JAVA_HOME" as follows
- Click Start, right click on Computer and select Properties.
- Select Advanced System Setting , click on Environment Variables.
- In the User Variables Pane click on New .
- In Variable name write JAVA_HOME and in Variable value give the address of JDK installation directory viz. if your java is installed inside program file of c:\ then give the address up to JDK1.6 directory.
Apache Tomcat Overview
- The folder structure after extracting is shown below.

- bin: Contains startup.bat for starting Tomcat and shutdown.bat for stopping the Server.
- conf: Contains server.xml for adjusting Server configuration like port number, host name etc., tomcat-users.xml for adjusting user roles for authentication, web.xml i.e the deployment descriptor.
- lib: Contains library files for supporting web applications viz. servlet-api.jar for Servlet application.
- webapps: This is for application deployment. This contains actual project may be in .war file or in normal folder structure.
- Typical server.xml contains information about server port, connector port, protocol, redirect port etc. If you want to change the corresponding ports u can change by editing it with your favorite WYSIWYG editor. Normally you need to change the connector port if you have installed Oracle database because Oracle takes 8080 port.
- server port:

- connector port & redirect port:

- Typical tomcat-users.xml contains information about users information i.e login information for manager status admin GUI etc.
- First Leave this step and go to Start the Server step.
- Original Content of tomcat-users.xml file given below

- Change the content of this by the following line. This is actually new feature in version 7.
<role rolename="tomcat"/>
<role rolename="manager-gui"/>
<role rolename="manager-script"/>
<role rolename="manager-jmx"/>
<role rolename="manager-status"/>
<role rolename="admin-gui"/>
<user username="tomcat" password="tomcat" roles="tomcat"/>
<user username="tomcat" password="tomcat" roles="manager-gui"/>
<user username="tomcat" password="tomcat" roles="manager-script"/>
<user username="tomcat" password="tomcat" roles="manager-jmx"/>
<user username="tomcat" password="tomcat" roles="manager-status"/>
<user username="tomcat" password="tomcat" roles="admin-gui"/>
<user username="admin" password="admin" roles="tomcat,manager-gui,manager-script,manager-jmx, manager-status,admin-gui"/>
- Make sure to remove comment line before replacing this above content.
Starting the Server
- Start the server by double clicking on startup.bat present in the bin folder.

- Open your favorite browser viz. Mozilla Firefox and type http://localhost:8090/ and hit enter.

- If you get this screen then congratulation...
- Now if you click on either "Server Status, Manager App, Host Manager", it will ask you for authentication. Now go to previous paragraph where we skipped earlier with tomcat-user.xml configuration.
- Now put username as admin and password as admin and press enter and congratulation again...
- Develop your web project and put it in webapps directory and access it..
- In another blog i will show you how to develop servlet application and deploy it in Tomcat Server.
No comments:
Post a Comment